
Table of Contents
If you don’t know how to clean a Ruger 10/22, don’t worry because you’re not alone. A lot of people don’t know how to properly clean a firearm in general and lucky for you, it’s not as complicated as it seems. When cleaning a Ruger, you don’t even need to strip it all the way down.
Based on researching Ruger 10/22 cleaning instructions and expert sources, I’ve put together this comprehensive guide that will teach you everything you need to know about tearing down, cleaning, and reassembling your rifle.
When to Clean Ruger 10/22
Everyone has a different thought on cleaning 10/22 rifles. Some people will tell you it’s important to clean it every 500 rounds of ammo while others will give you as many as 5,000, while they’re both right – they’re also both wrong.
It all depends on what type of shooting you’re doing. For example, if you’re a benchrest shooter trying to get super close groups then you’ll want to clean your Ruger more often than someone else.
Some people are a bit more reactive and they don’t clean their rifles until something starts to go wrong. The military rule says you should clean it every day.
The environment you’re using your Ruger in also plays a factor here. If you’re using it frequently in humid and wet environments you’ll likely clean it more often. Even if you don’t, it will help prevent your rimfire, handgun, centerfire, or semi-auto from fouling.
A great indicator to tell you when you should clean your rifle is when it looks dirty. Not too complicated right?
Do a quick visual inspection of your gun right now, does it look dirty? If you can visually pick up on areas that you would consider “dirty” then it’s definitely time for a clean.
Getting on a proper cleaning schedule is important because it will ensure your gun feeds properly, fires, and ejects accordingly. Your gun is a machine like anything else and it needs maintenance.
Required Tools/Ingredients to Clean Ruger 10/22
Now that you’ve determined it’s time for a cleaning, let’s take a look at some of the ingredients or components you need to put together for a proper clean. You don’t need all of these, but we want to make sure to cover all the possibilities you might encounter when you start disassembling your rifle.
Gun Cleaning Solvent
The most important thing you’ll want to have is a proper gun cleaning solvent. I recommend HOPPE’s Gun Medic. It cleanses and lubricates everything and evaporates in 60 seconds which leaves a slight coating of lube without it becoming messy or overkill. A four ounce aerosol can is more than enough to last you quite a while.
Aerosol Spray
The aerosol spray is an optional item but it’s great for cleaning the trigger assembly. You can spray it throughout the assembly even while it’s still assembled and let it soak up the spray. Wipe it clean and you’re good to go.
Lubricating Oil
Oil is an obvious component you’ll need. You’ll need to lubricate the rotary magazine shaft and the barrel action to keep it from rusting. Go with HOPPE’s No. 9 if you need lubricating oil. Knowing how to clean a Ruger 10/22 rifle is all about proper lubrication. If you go to put it back together it won’t operate properly if you didn’t lube everything up nice and good.
Bore Snake
You need a bore snake to clean the barrel. Make sure you wash it well because this tool will get the greasiest and grimiest after each use. If you don’t have a muzzle guard you’ll especially want to use a bore snake instead of cleaning rods.
Swabs/Q-Tips
Next, you’ll want to have some cotton swabs or Q-Tips with you. You’ll use them to clean the bolt assembly and make sure you get plenty of them because they’ll get grimy fast and they break easily.
Metal Brush
You’ll use a metal brush attached to the cleaning rod. This will be used for cleaning out the barrel, but be careful to get something that is nice and coarse otherwise you can scratch the barrel if you pull back on it.
Rags
I think it’s pretty obvious why we suggest having rags. You’ll need plenty of rags to clean excess solvent and to make sure you can get everything nice and clean. You don’t want to have to use your good towels, right?
Small Brass/Plastic Brush
As you’re going through the Ruger 10/22 disassembly you’ll notice a lot of small parts and holes that can gather dirt and grime. To get in there, you’ll need a small brush. Sometimes a brass brush is too rough so having a plastic one is helpful. On the other side of the coin, certain situations call for a bit more abrasiveness and in that case, you need the brass brush.
If you get a Ruger 10/22 cleaning kit like the Outers 28 Piece Universal or the Otis Tactical Breech-To-Muzzle gun cleaning system, these come with all the tools and items you need to properly clean your Ruger.
You’ll also want to have a slotted/standard screwdriver and a hammer with you. These are two tools you likely have already.
What Parts to Clean
When you’re ready to get started cleaning your Ruger 10/22, there are four main sections on the rifle that you’ll clean. If you’re unfamiliar with them, they are the:
- Barrel and Extractor Slot
- Receiver and Bolt Assembly
- Trigger Assembly
- Magazine
We will break it down step-by-step so you understand exactly what you’re doing.
Step-by-Step Guide on Cleaning a Ruger 10/22
Disassemble Ruger 10/22
Here are the five steps you should follow when you disassemble Ruger 10/22 rifles:
1. Loosen your front band screw and remove the front band from the rifle.
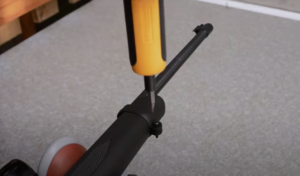
2. Loosen the screw from underneath the barrel stock.
3. Push in the safety button so you have an equal exposed amount on each side. Next, slowly move the rifle mechanism up and away from the stock.
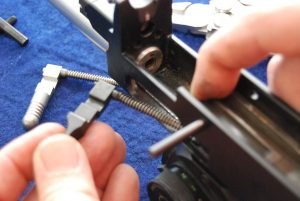
4. Remove each pin keeping the trigger and bolt assembly held together. What this will do is separate the bolt assembly from the trigger assembly which makes it easier and more effective to clean.
5. Remove the charging handle and the bolt.
Cleaning Ruger 10/22
Now let’s cover the in-depth steps you’ll need to take when learning to clean a Ruger 10/22 Takedown.
Cleaning the Barrel and Receiver

Make sure you use a muzzle guard to keep your barrel in position so you don’t damage the crown. The barrel and receiver are two of the dirtiest parts on the rifle so take care with these steps.
1. First, take your bore snake because we’ll use it for bore cleaning. Go figure! Some people prefer to use a cleaning rod because the bore snake gets too dirty and it requires more maintenance when it comes to cleaning, I find it more effective and faster this way.
2. With the bore brush attachment, push the rod through the barrel and once it’s passed all the way through, remove it and slide the rod back. You do not want to pull the bore brush back because it will damage the barrel. You can repeat this process as many times as necessary until it comes out clean.
3. Now you’ll want to have a patch tip on the end of your bore brush and run that through the barrel. Keep doing that until it comes out clean.
4. Take a clean patch and put plenty of oil on it. Slide that through the barrel for lubrication and do this as many times as necessary until you feel that it’s well lubricated.
5. Take your wire brush and solvent to clean your receiver.
6. Clean the extractor channel and receiver to prevent rust buildup.
Clean Trigger Assembly
Cleaning a Ruger 10/22 trigger assembly is not as common of a practice unless you’re really rolling around in the dirt. In the event that you do want to clean it, here’s how you’ll do it.
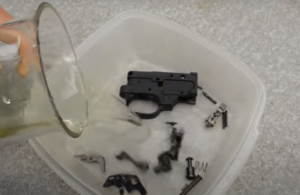
1. Take your aerosol spray and coat the trigger assembly when it’s still intact. You can strip it, but you can do it assembled as well.
2. Let it soak for a few minutes while you’re cleaning other parts.
3. Take a clean rag and wipe it up until nothing remains.
Clean Bolt Assembly
Next we’re onto the bolt assembly which plays a huge part in the accuracy of your shot so you need to make sure it stays clean.
1. Take your cotton swabs and soak them in your cleaning solvent and clean the bolt assembly.
2. Remove excess solvent using rags or additional cotton swabs.
3. Apply lubricating oil to cotton swabs and apply it to the bolt assembly when you’ve finished cleaning it.
Clean Magazine
Knowing how to clean a Ruger 10/22 magazine is crucial to maintaining the life of your rifle. It helps with proper feeding and it’s one of the simplest parts of the process. You don’t need to disassemble anything and no lubrication is needed.
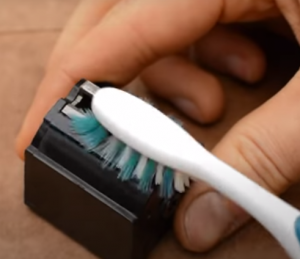
1. Using a soft brush, remove any visible residue from the magazine.
2. Take your cotton swabs, dip them in gun cleaner, and use that to remove any dirt in tough places.
3. Take dry cotton swabs now and wipe away any leftover solvent and use a dry rag if needed.
4. Put a couple of drops of lubricating oil on both sides of your rotary magazine shaft.
Assemble Ruger 10/22
Now you know how to clean a Ruger 10/22, it’s time to talk about reassembly. We haven’t completely stripped it so putting it back together is simple.
1. Flip the receiver over and insert the charging handle. Make sure to align it with the receiver.
2. Insert the charging handle all the way and then put in the bolt assembly. Replace the bolt stop pin to hold everything in place.
3. Now you can add the trigger assembly to the receiver base and reinstall all the pins.
4. Take some lubricating oil and put it over the barreled action to help with rust.
5. Attach the action, stock, and reinstall the front band back in its spot.
6. Coat the entire rifle with a lightly oiled rag to keep it from rusting.
Final Thoughts
Learning how to clean a Ruger 10/22 is simple. You don’t have to get too involved by stripping down to the nuts and bolts to get all the problem areas. The main goal is to ensure you get all the dirt and grime out while properly lubricating everything so you don’t have to deal with rust and malfunctions down the road.
Take all the tips from above as well as some of the product recommendations and put them to good use. Take care of your rifle and it will take care of you!